How to Draw a Smiling Mouth Without Teeth TUTORIAL
This tutorial shows how to draw a smile in twelve steps. Information technology explains how to structure your line cartoon and shows an easy way to apply shading.
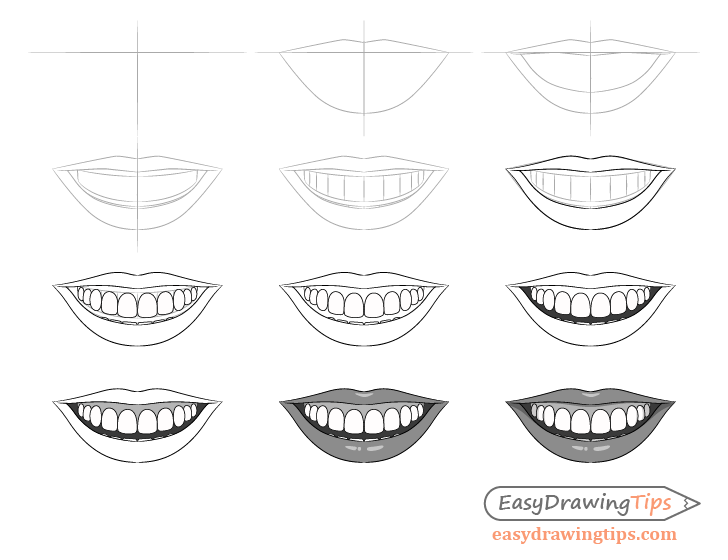
You tin can create a fairly realistic cartoon of a smiling mouth without needing to add too many circuitous details. The examples in this tutorial bear witness how y'all tin use pretty much the bare minimum lines and shading to become a nice and professional person looking cartoon (even every bit a beginner artist).
Offset the tutorial in pencil and draw very light lines (just barely visible). Yous tin trace over your lines to darken them once you feel that everything is in the correct place.
For the shading portion of the tutorial you tin use a pencil, paints or even markers (as long every bit the markers have enough greyness variants).
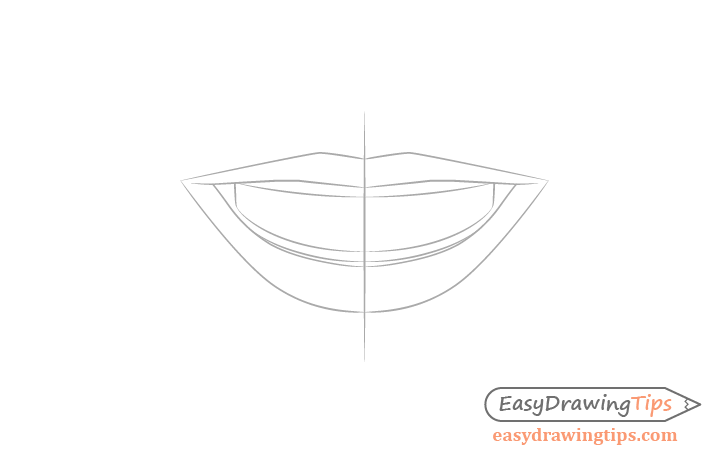
Stride 1 – Describe the Guide Lines for the Smile
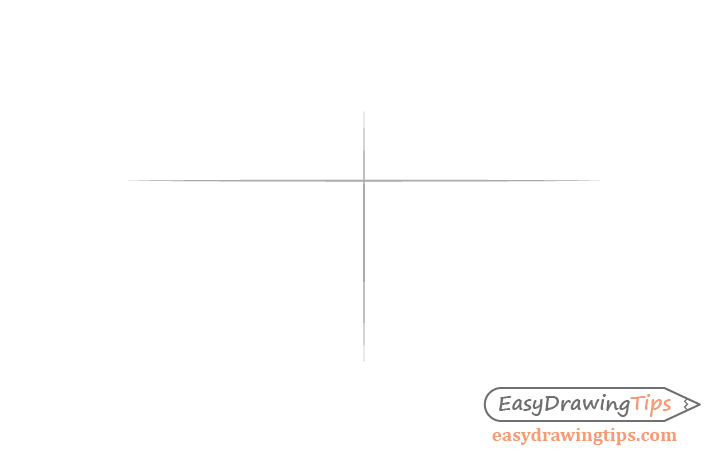
Begin the cartoon with a pair of lines, on vertical and i horizontal. The horizontal line should run through where you lot wish to accept the middle of the smiling. It's goal is to help you lot come across if both halves of the mouth are relatively even in width.
Th horizontal line should exist positioned at the level where you lot will add the corners of the rima oris. The goal of this line is to assistance you make sure that the lips are not overly skewed to one side.
Step 2 – Outline the Shape of the Lips
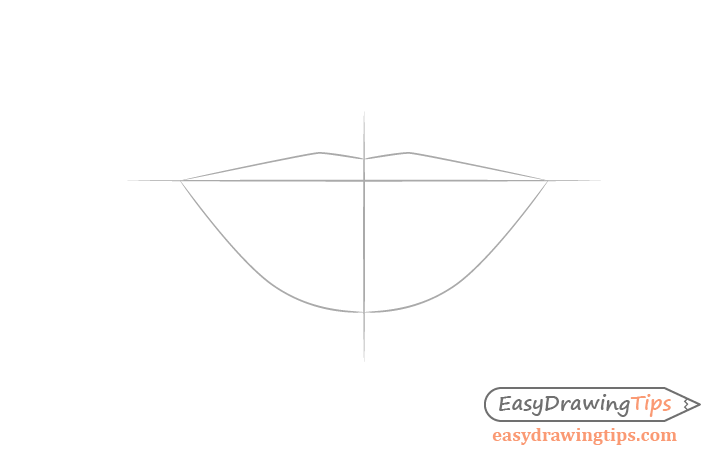
Based on the guide lines in the previous step sketch the outer shape of the mouth (as shown in the above example). At this indicate get out out any of the smaller curves of the lips. Describe their upper part with but straight liens that expect similar a flattened letter of the alphabet "Thou". Draw bottom portion with a curve that then transitions into a straight line on each of the sides that goes up to the horizontal line (corners of the rima oris).
The reason for starting with a simplified sketch like this is that it's very like shooting fish in a barrel to make and quickly allows you lot to meet if you have the shape y'all want. If not you tin can erase information technology and start again.
The more details you add the more backtracking you will have to exercise in case y'all don't get the shape you desire. And so start with the bare minimum.
Stride three – Outline the Shape of the Rima oris
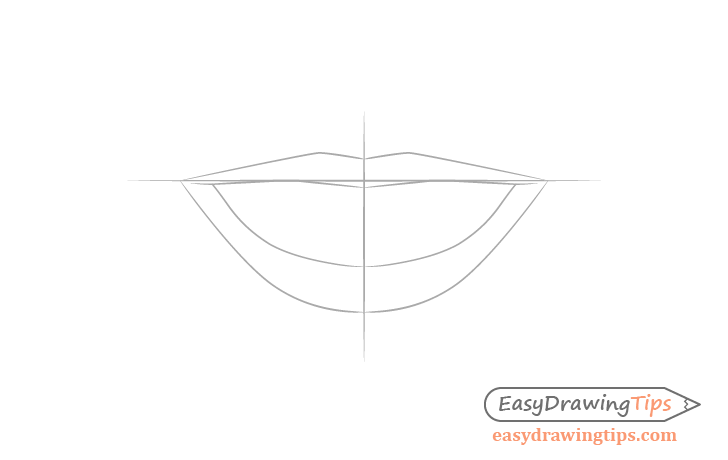
Inside the outer drawing of the lips add the opening of the mouth/inner shape of the lips. You can once more brand this somewhat simplified using directly lines for the upper portion.
To keep your drawing from getting too cluttered y'all can erase the horizontal guide line one time you are finished with this step.
Step 4 – Outline the Combined Shape of the Teeth
Inside the oral fissure add the outline of the upper row of teeth equally well every bit a hint of the lesser row.
By and large the teeth in the front will be longer and the ones in the back shorter. This will further be emphasized by perspective as information technology will brand the back teeth announced smaller.
For more than on perspective encounter:
Perspective Drawing Tutorial for Beginners
Due to the angle the mouth is drawn from and the shape of the jaw the rows of each row of teeth volition also have a curve to it. Take this into account too when drawing them.
Step 5 – Space Out the Teeth
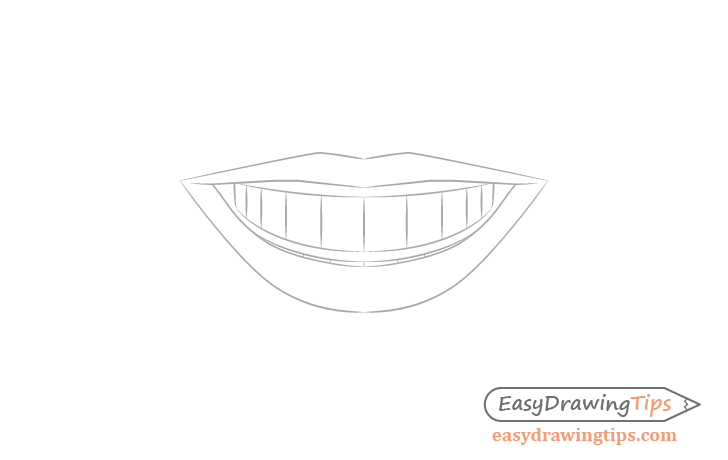
Before cartoon out each individual molar draw some vertical divider lines to gauge their size.
Keep in listen that the teeth in the back will exist partially hidden backside other teeth and will appear narrower. The front end teeth are as well mostly larger then the sets of teeth close to them.
Once done with this pace you should take a pretty much finished construction drawing of the grinning mouth with all of the major parts planned out.
Step vi – Outline the Organic Shape of the Lips
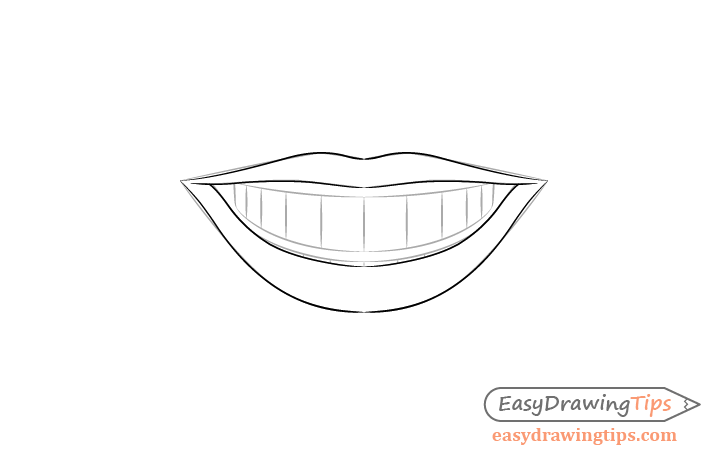
You tin now create a more than organic outline of the rima oris based on the structure drawing.
Begin by outlining the lips and calculation their smaller curves. You can brand these lines darker than the construction lines just don't brand them nighttime to the point where they are likewise difficult to erase. Every bit yous may however need to make some corrections.
You tin can erase the construction lines for that role of the drawing once done.
Step vii – Draw the Individual Teeth
Again based on the structure drawing add add in the individual teeth.
When doing this you can probably see how much easier and faster it is to practice this once y'all accept the construction lines to help with their placement.
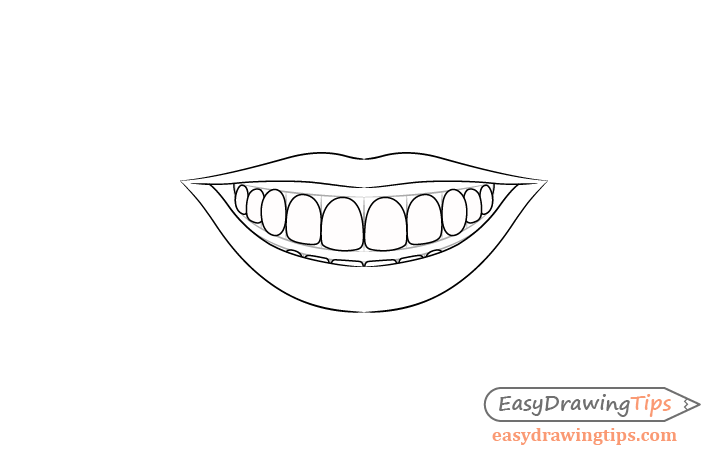
Step viii – Make clean Upwardly the Drawing
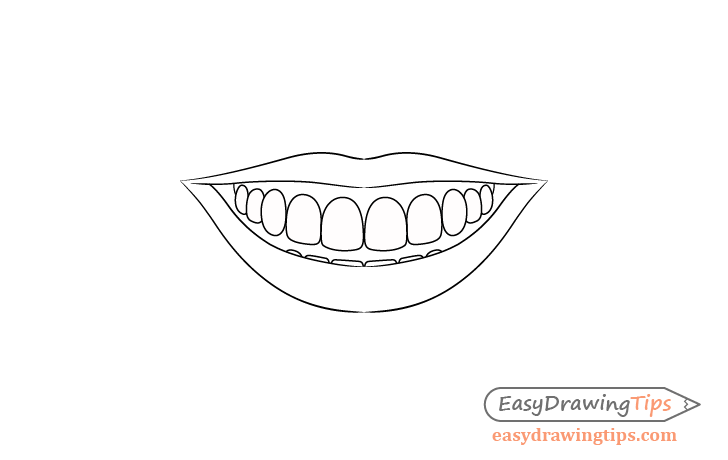
Finally clean up the cartoon past erasing all of the construction lines. You can also trace over the cleaned up drawing with a darker pencil stroke or a recollect blackness pen/marker.
If you are worried about making a error then a pencil is the best selection as information technology can be erased.
Step 9 – Shade the Oral cavity
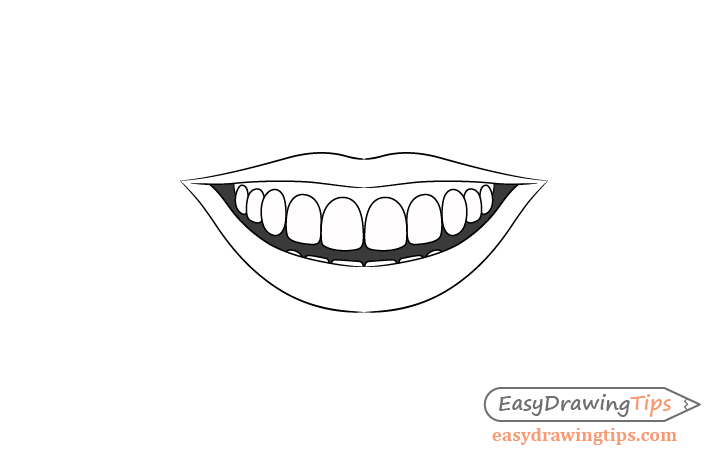
Equally mentioned earlier this tutorial will focus on the bare minimum shading.
Begin by darkening the inside of the mouth with a very nighttime grey (y'all can even just get in black).
Once again as mentioned earlier you can do this a pencil, paints or markers. Yet a pencil is recommended the other two tin make information technology hard to correct mistakes.
Step 10 – Shade the Gums

Make full in the gums with a much lighter grey as compared to the inside of the previous one.
Pace eleven – Shade the Lips
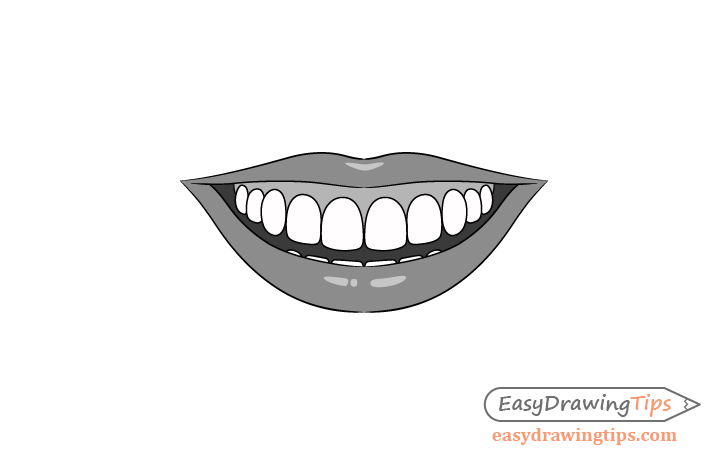
Finally shade in the lips with a grey that is slightly darker than that used for the gums merely leave a few light spots similar to the instance above. These will be the highlights (light reflecting from the lips).
Highlights can help make the lips look shiny, wet and more three dimensional then if y'all were to but shade without them.
Footstep 12 – Terminate the Smiling Cartoon

Finally to make the oral fissure look even more three dimensional you tin add some adequately generic shading. In this example the mouth will be shaded as though information technology'south in fairly common lighting conditions such as a well lit room or daytime outside.
The shadow will exist located as follows:
- Below the upper lip (on the gums) – cast by the lip
- In each corner of the mouth on the bottom lip – again bandage by the upper lip
- On the teeth towards the back of the mouth (smaller shadows towards the front and fully shaded teeth in the very back) – as less light tends to attain here
- On the bottom row of teeth (fully shade them to be slightly darker than the summit row) – again more often than not less light reaches here
Once washed with the shading you should have a finished drawing of a smiling.
Decision
This tutorial shows how you can use a basic line drawing with simple shading to create a fairly realistic looking drawing of a smile. Of grade the same principals and similar drawing steps tin can as well exist applied to drawing other parts of the body as well as many other objects. Start with a construction drawing followed past a line drawing and then shading. As you can see from the example in this tutorial fifty-fifty some very simplistic shading makes the smiling oral fissure stand out a lot more as camped to one washed with just lines.
For more than on drawing lips see:
- How to Draw Different Types of Lips
- How to Draw Lips From 3 Unlike Views
For cartoon entire faces see:
- How to Draw a Female Face Step by Step Tutorial
- Tips on Drawing the Same Male Face of Dissimilar Ages
DOWNLOAD HERE
How to Draw a Smiling Mouth Without Teeth TUTORIAL
Posted by: kennyrone1976.blogspot.com


Коментари
Публикуване на коментар